|
To Setup SMTP Authentication (for JMail Pro only)
This setup is mainly for JARING UUCP account user who use TM-net Streamyx connection. JARING have open up the SMTP authentication interface for the above mentioned customer. At this moment, they will be no charge for this service. JARING may impose some charges in the future. If you are using Streamyx connection (all type), for JMail user, you need to upgrade to JMail Pro. For Streamyx with fix IP Address (corporate account), you may chooise "send mail directly to the recipients' server" or follows the following steps to setup SMTP Authentication. For Streamyx with Dynamic IP Address (home account), you have to setup the SMTP Authentication.
Before you want to setup the SMTP Authentication, you should setup your UUCP account parameter first.
First, go to Settings -> System to bring up the "System Setting" windows.
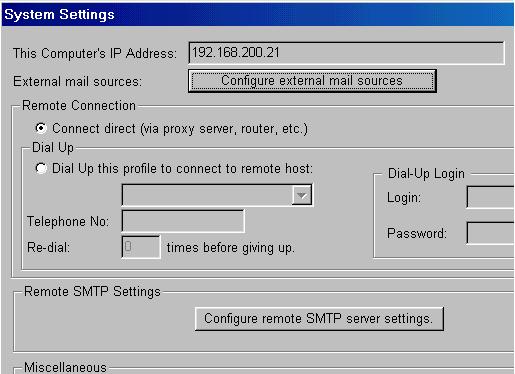
Click on the "Configure remote SMTP server settings". You should see the following windows appear:
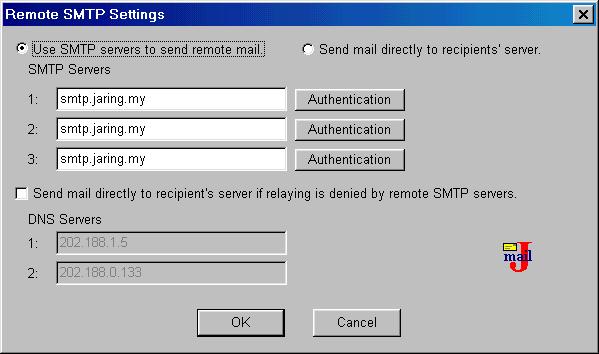
Type in the SMTP server as "smtp.jaring.my" and click the first "Authentication" buttom from the top. You should bring up the following windows:
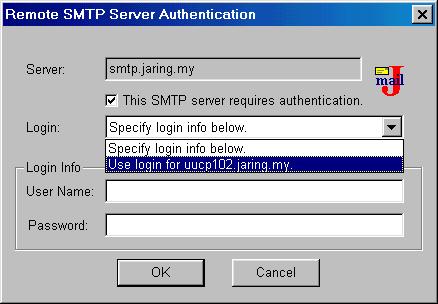
Select the "This SMTP server requires authentication" by click the small little box at the left. Since the User ID and Password is the same as your UUCP account, chooise the "Use login for uucpXXX.jaring.my" (the XXX is the uucp server number), and then click the "OK" buttom. That all.
**********************************************
This is a little help
on how to setup Jmail. You can use Jmail under Windows 95, Windows 98
or Windows NT 4.
First, you need to run the JMail setup. Just run setup.exe from the installation
disk. If you wish to run Jmail under Windows 95, please run W95ws2setup.exe
before you run Jmail setup.
After you run the above setup programs, you need to configure your system
for dialup to Internet, this means that you need to setup TCP/IP, Dial-up
Networking (or Remote Access Service on NT4). Additional help is available
at JARING helpdesk.
We have also included a dialup script in the setup program. You will find
it at the Program Files/Accessories Folder after you run JMail setup.
The file name is jar-jmail.scp.
Test your Dialup Networking (DUN) or Remote Access Service (RAS). Make
sure you are able to connect to JARING before you start JMail for the
first time. Use the supplied dial-up networking script to ensure success.
Once you have the dial-up utility configured, you can start your Jmail
program. You will find Jmail icon at the Start -> Programs -> Jmail.
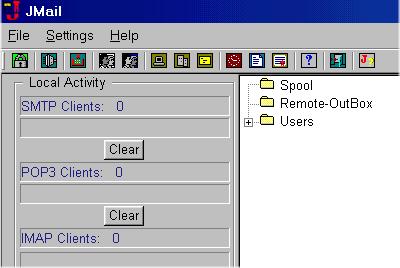
The first screen you see will be the screen shown below:
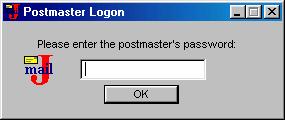
Type in "postmaster"
as the default password. You will enter Jmail's main console. At the main
console, select the Settings -> Server option from the menu.
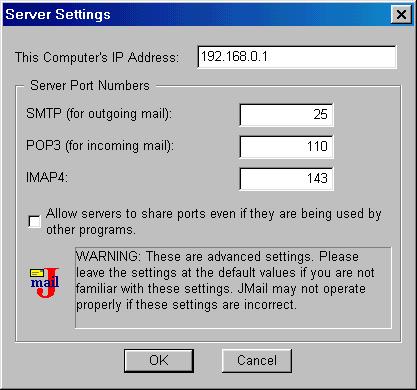
You need to key in the required infomation.
1. This Computer's IP Address
This is you machine IP address and should be auto detech during JMail
installation. Since your domain is not connected directly to the Internet,
you can assign any Private IP address to you network. You need to assign
one IP Address to each computer you wish to connect to Jmail. You can
key in the IP address at Start -> Settings -> Control Panel ->
Network. You will find an entry that reads "TCP/IP->You network card
name". Double click this entry. Choose the "Specify an IP Address" and
key in the IP address you want with the subnet mask as 255.255.255.0.
In this example, Jmail's machine IP address is 192.168.0.1. You will find
the same IP address at the Local Domain's IP Address field. If this is
not the case in your installation, please key in the correct IP address.
2. Server Port Number
These Port Numbers are default port number. If you do not need to alter
the port number, just leave it as default.
Press "OK" to accept your settings.
At the main console, select the Settings -> System option from the
menu.
1. Mail retrieval Method
If you are a JARING subscriber, please choose "Use UUCP to retrieve mail".
JMail support Domain POP or Dial up SMTP retrieve method. If you are a
Nasionet or Putra Net subscriber, please choose "Use POP3 to retrieve
mail".
2. UUCP/POP3 mail server
This field is to key in your UUCP/POP3 mailbox location. You will find
this infomation on your JARING or your ISP registration document. For
JARING Subscriber, as in the "For Accessing UUCP Mail" section in your
registration document, if you Username is nuucp103, it means your UUCP
mailbox location is at uucp103.jaring.my.
3. Connect Direct
If you are using a leased line or proxy server (ie Wingate) to connect
to Internet, select this option.
4. Dial up this profile to connect to remote host
If you have created a profile using Dialup Networking, you can see the
profile listed in this field. Choose the profile you created. In the above
example, the profile name is "Jaring".
Note: This profile should ideally utilise the jar-jmail.scp dialup script.
5. Telephone No:
It should be 1511 to connect to JARING. For Nasionet and Putra Net subscriber,
please check with your ISP.
6. Re-dial:
Key in the number of times you wish to re-dial if the line is busy.
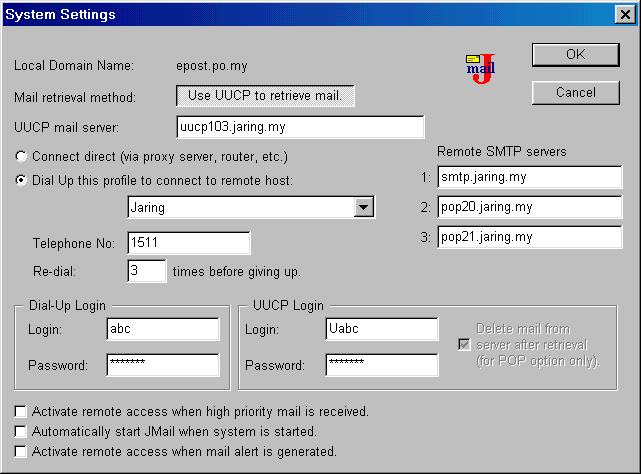
7. Remote SMTP servers:
Since Jmail will send the outbound mail to a SMTP server rather than a
UUCP server (this is the special feature of Jmail) you need to tell Jmail
where to send your outbound mail. The default JARING SMTP server is smtp.jaring.my.
For Nasionet and Putra Net subscriber, please check with your ISP. You
may specify two additional SMTP servers for Jmail. All JARING POP3 servers
are also SMTP servers. Therefore, you can choose any server from the range
pop1.jaring.my to pop27.jaring.my. In the above example, pop20.jaring.my
and pop21.jaring.my have been chosen.
8. Dial-Up Login
For JARING subscriber, if your domain name is "abc.po.my", your login
name will be "abc". You should know your password. Please note that the
password is case sensitive.
9. UUCP/POP3 Login
As per the JARING requirement, you need to put a capital "U" in front
of your login name. Example "Uabc". The password will be the same as your
diap-up password. Case sensitive! For Nationet and Putra Net subscriber,
please check with your ISP.
10. Activate remote access when high priority mail is received
If you wish Jmail to connect to JARING (ISP) immediately after it receives
a high priority mail from your users, activate this feature.
11. Automatically start JMail when system is started
If you wish JMail to start up automatically when you start your computer,
select this.
12. Limit outgoing remote mail to xxxx K bytes
Since most of the ISP are limiting the size of the e-mail send to their
SMTP server, you can set the outbound limit to the ISP's limit. If local
users send an e-mail beyond the limit, JMail will bound back the e-mail
to the sender immediately.
Press "OK" to accept your settings.
Now you can setup the Remote Schedule table for Jmail to dialup or connect
direct to you ISP (JARING) server to retrieve or send mail. From Jmail's
menu, select Settings -> Remote Schedule. Remember to activate Enable
Remote Access.

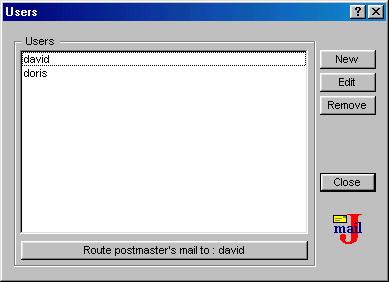
You may wish to create a few new users now. From Jmail's menu, select
Settings -> Users. Remember to designate one of the users to receive
the postmaster's mail. Usually, this user is the administrator for your
domain.
That's all you need to do to set-up Jmail. You may test your setup by
selecting File -> Remote Transfer - Now! from Jmail's menu.
At the user's computer, you may install any POP3/SMTP client application.
Set it up as usual. When the POP3/SMTP client software asks for POP3 and
SMTP server information, just key in the Jmail machine's IP address. In
the above example, the IP address is 192.168.0.1.
All done!
For support, please send e-mail to support@jmail.com.my
Last
updated 10 September 2003
© 2003 Comtronic Enterprise. All rights reserved. Other products and companies
referred to herein are trademarks or registered trademarks of their respective
companies or mark holders.